
This is the third article in a three-part series about outlining the process for purchasing land with the intent to lease it to a solar developer. This is a personal project, but I felt it would be fun and appropriate to share the story with HeatSpring readers.
Part 1 focuses on investment criteria and a basic sensitivity analysis of the best, middle, and worst case scenario. Part 2 deals with the risks of the process and how to think about reverse engineering the land acquisition process to remove as much risk as possible.
In this section, I’ll cover the land research tools that I’m using and go through a step-by-step process of the initial screening of some land.
This is an area that I have very little direct experience with and am learning as I go. If you have any suggestions or noticed that I said something incorrectly, please let me know in the comment section.
Solar Power Plant Cost 101
This article will focus specifically on the land economics that determine the overall solar power plant cost. If you want to dig deep into commercial solar development and how to calculate solar power plant costs, I have two resources for you:
- If you’d like, you can to join a LinkedIn group with 600+ professionals discuss the best practices for financing commercial solar projects.
- If you need to review some basics of financing commercial solar projects, check out Commercial Solar PPAs 101 or skim through all of our past articles on commercial solar finance.
Article Outline
- Research tools. I’ll outline the tools that you need to do basic land research.
- Step-by-step process for identifying land. I’ll walk through the process that I’m using the identify the land.
- Screening and ranking. How to start screening and ranking the land.
Before we get into the research, it’s important to understand the risks that we’re trying to figure out in the research. I outlined the risks in Part 2 – Solar Land Development Risks 101.
We concluded that there were both manageable risks and unmanageable risks. Manageable risks could be researched before the land was purchased while unmanageable risks could not be managed until an action was taken.
RESEARCH TOOLS
First, let’s start with the research aspect. Here are the tools I’m going to use:
- Zillow will be used for identifying the land.
- Oliver GIS will help with research on many aspects of the land. This includes topographic features, zoning, and land use restrictions.
- The building department of the jurisdiction where the property is located.
- Faze1 will be used to quickly determine the utility territory.
- The spreadsheet tool in Google will be used to keep track of all the information that is collected.
- The utility’s distributed generation (DG) or solar website will be used to contact them about feeder size on a particular site.
Step-by-Step Process for Identifying Land
- Find properties for sale that meet our general criteria.
- Check Oliver GIS for land characteristics.
- Identify the utility service area of that territory and contact the utility.
- Review any local zoning and permitting requirements.
- Repeat until you have 3 to 5 properties.
For each of these areas, there are a number of characteristics in each section that I’ll be track data on. This will be used to rank order each property.
Identifying the Property
- Cost: No more than $30,000
- Size: At least 5 acres. In my case, because a house will go there, I’ll look for roughly 10+ acres. An acre is 43,560 square feet, so you can do the conversion when searching on Zillow.
- Location: The sticks are great, but they tend to have lower feeder capacities and access to three-phase power. I’ll try to focus on industrial and commercial districts, north shore, northwestern and then central and western Massachusetts.
- Road Access: The land must have road access. A road could be built, but that’s
- Three-Phase Power Access: This is simply a requirement; it needs to be within a half mile.
GIS Screening Criteria
- Topography: The ideal is flat (i.e. less than 10 percent grade). However, I’ve found some developers that are okay with slant, as long as it’s to the south.
- Rivers, Flood Zones, and Wetlands: We need to make sure we don’t have any of these in the property because you can developer solar on the features.
- Vernal Pools: Can’t have any vernal pools.
- Agricultural Preservation Areas: Development is not allowed in these areas.
- Assessor’s Parcel ID: This will be used to determine land ownership and zoning.
Utility Service Territory
- Identify the utility that services the area.
- Get their solar or DG contact information to reach out to them about feeder capacity.
Local Zoning
- Check the local zoning laws to see if there are any restrictions on solar.
Step-by-Step Example
Step 1 – Identify properties.
I put my search criteria in Zillow and found that there are currently 33 properties that are greater than 5 acres (175,000 sq. ft.) and cost no more than $30,000. In the future, I could update the asking price to be a little higher than $30,000, understanding the price could be a little lower. Also, keep in mind that most homes and properties are listed during the spring and early fall. It’s reasonable to assume that the market has the lowest supply right now.
Here’s are all the properties I found:
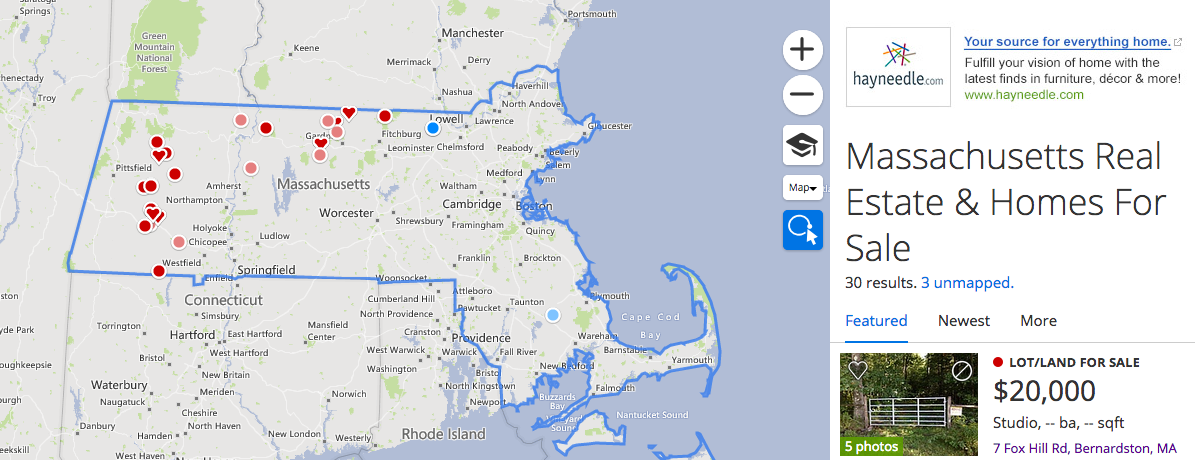
Step 2 – Pick one property to start screening.
Out of the 33 available properties to choose from, here’s the one I picked for the analysis:
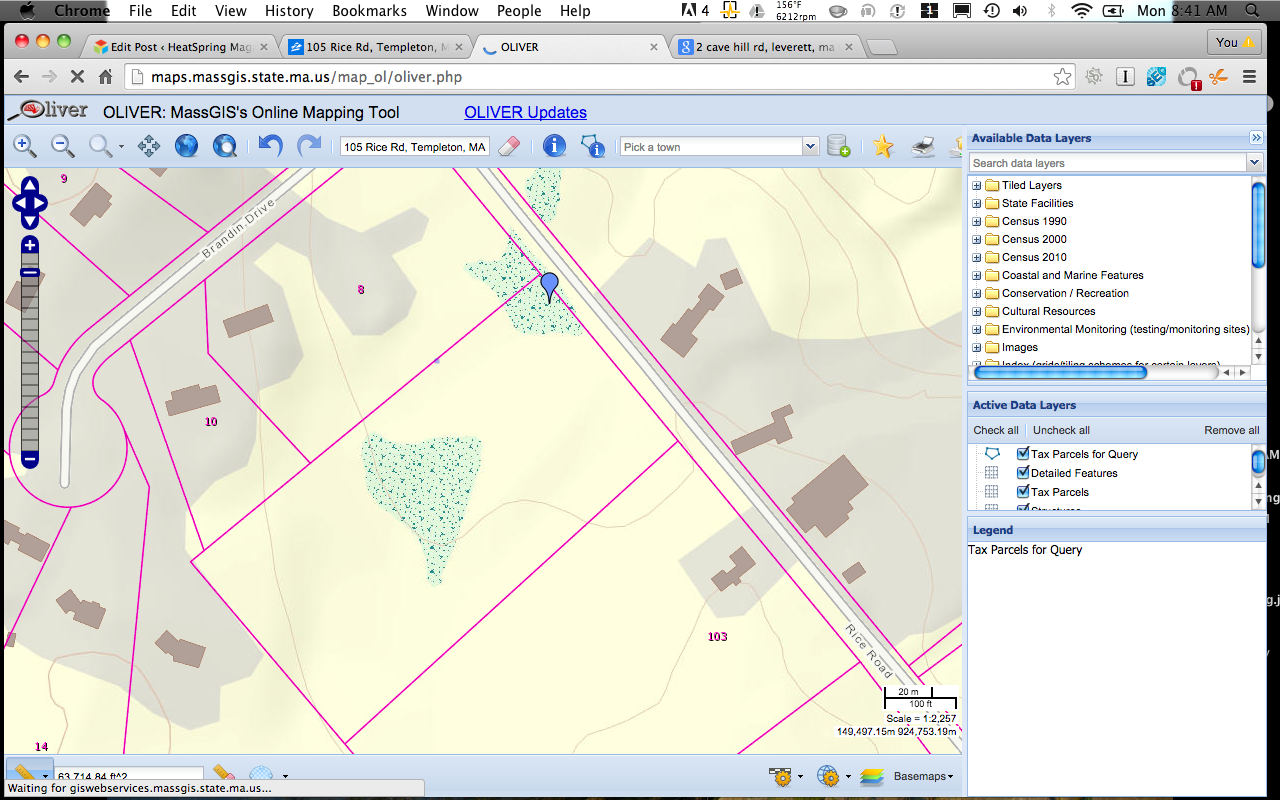
Property: 105 Rice Road, Templeton, Massachusetts
Size: 4.86 acres. This is barely big enough. I wouldn’t be able to also fit a home on here. But we’ll use the land for analysis purposes.
Cost: $18,000
Three-phase power? Unknown. The properties appears to be a MAssachusetts road with a route associated with it, which could suggest it’s not completely away from town.
Road access: Yes.
Step 3 – Perform basic land screening with Oliver GIS
Here is the land on Oliver GIS. It’s the rectangle that has the blue pin in the top corner.
Here are items that we’ll be screening for:
- Topography and general slope?
- Southern slop?
- Woods?
- Flood plain? Rivers?
- Vernal pools?
- Wetlands?
- Agricultural preservation areas?
You can see on the bottom right of Oliver GIS that I’ve put in the information that I want to screen for under “Active Data Layers.” You can search for those layers under “Available Data Layers” on the top right.
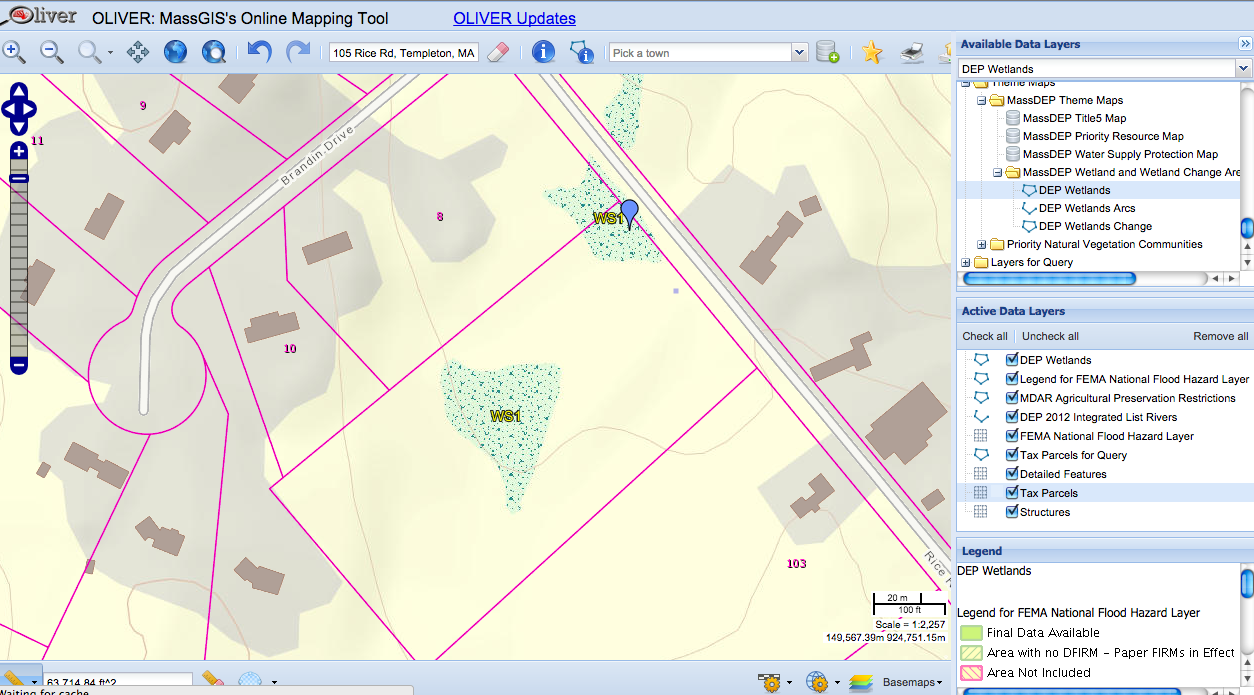
Here is the screen shot of the property from above:
Here are the results
- Topographys and slope? If you look at the GIS map, you’ll see two topographic lines. Each line represents a 20-foot increase. There’s a 40-foot change over 600 feet. This is a very slight slope.
- Southern slop? The slope is to the north-east. However, because the slop is so slight, this might not be an issue.
- Wooded? Yes, the area is wooded. This means it would need to be cleared.
- Flood plain? The are is not within a flood plain. If it was, we would see some sort of mark on the property.
- Rivers and floodplains? The area is not within a river shore or floodplain.
- Wetlands? This is the largest problem with the property. You can see that there is a wetland directly in center of the property. If it was a larger property and we could build around this area, it might not be a problem. However, because it’s only 5 acres, we would need to utilize the entire area to fit a 650kW array. This one aspect makes the property not useful for this application. However, I’ll continue the analysis as a teaching example.
- Agricultural preservation areas? There is no agricultural preservation area on the property.
- Road access? Yes.
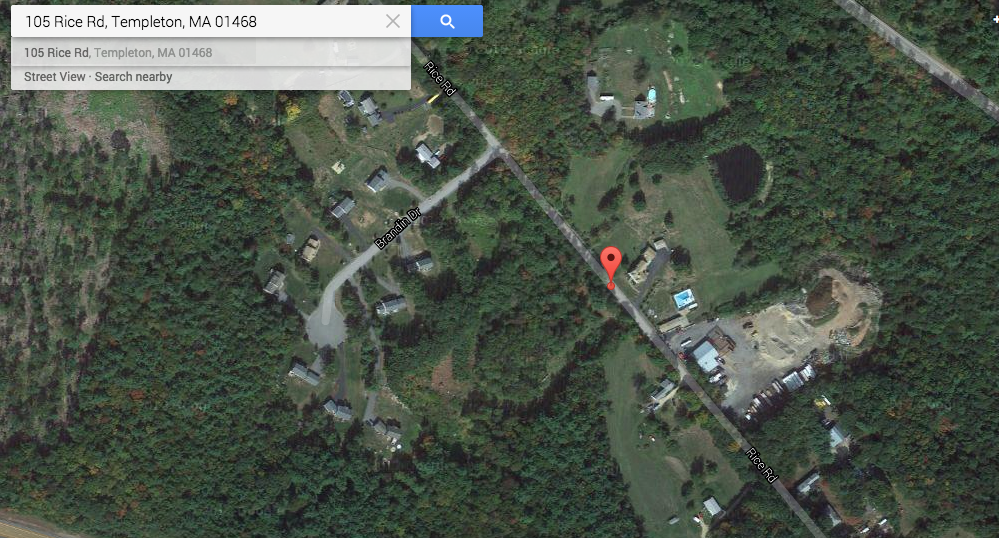
- Access to three-phase power? If you look at the property from the satellite, you’ll notice that it’s at the end of road. This likely means that it won’t have three-phase power. If it was on a main road connecting two towns, it would be likely to have three-phase power.
Step 4 – Find the utility area and reach out.
Step 4a. Find the electricity supplier. Luckily, I have access to the Faze1 tool, so I could look up who the utility provider was for the adjacent properties. I found that the properties were served by a municipal utility, Templeton Light and Water.
Here’s what the Faze1 output looks like. You can see the utility service provider on the right.

Step 4b. Contact their DG group about feeder capacity. Because this is a municipality, I would simply call the number and ask to speak with the folks responsible for solar interconnection.
If this wasn’t a municipality, here are the pages to find the contact information for the larger utilities in Massachusetts:
Step 5 – Local Zoning
In Massachusetts, you’re allowed to developer solar projects on any piece of property. However, some AHJs have specific rules for solar.
For Templeton, I searched “Templeton Massachusetts zoning laws” to find their zoning laws document.
In this document, hit Control+F and search for “solar,” to see if there are any solar-specific clauses.
Here are some key things you’re looking for:
- Setback requirements, project size limitations, what zones are eligible to be built in, special permits required.
- You’re goal is to figure out how easy it is to install solar. Note the requirement differences of “require” versus “subject to” language.
Conclusions on this Property
This screening took me about 20 minutes. Here are my conclusions from the process:
The property would not be suitable for solar development because it has a wetland directly in the middle. Additionally, it likely doesn’t have access to three-phase power, simply because of the type of road it is on. If everything else about the property was perfect, I’d likely call the utility to find out about access to three-phase power.
This shows the general process for doing early-stage research on land for solar development.
Questions? Comments?
If you have any questions or comments about the process, please put them in the comment section below.


